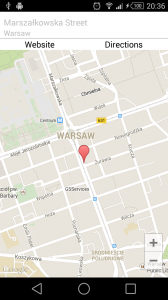
Would you like to show map in your smart Android app? It is very easy, but after successfully passed some steps. In this tutorial I would like to make these steps with you to make the process faster and in a specific case – we will show our map in nested fragment.
Before funny work with the Android code we need to go through basic checkpoint list:
- Check if you have installed a Google Play Services in your Android SDK Manager. If no of course please install it! Second part of this point is to import the google-play-services-lib project into your workspace.
- Find your debug.keystore (or other) to list some details about it (like SHA-1 hash which is extremly important to accomplish next step.
- Create Google Maps API Key basing on SHA-1 from 2nd step and your application package name.
Don’t worry! It is very easy and quick job. I created a short clip which explains everything (I think so, if not please follow this guide)
4. Next step is to download tutorial project from repository (or from here) and import it to your workspace. Remeber to add previously imported google-play-services-lib project as library! And don’t forget about downloading platform with Google API image in your SDK Manager!
The project contains a lot of files, but the most important are:
- AndroidManifest.xml
- ActivityWithMap.java
- AddressDetailsFragment.java
- MyMapFragment.java
First of all – manifest. Surely you found new xml tags there. First one is declaration of uses-feature – we specify version of OpenGL ES which is required to run the app. Next there are some required and recommended permissions. Last but not least metadata tags where one of them contains previously created Maps API Key – this really important tag.
<uses-feature
android:glEsVersion="0x00020000"
android:required="true" />

<uses-permission android:name="android.permission.INTERNET" />
<uses-permission android:name="android.permission.ACCESS_NETWORK_STATE" />
<uses-permission android:name="android.permission.WRITE_EXTERNAL_STORAGE" />
<!--
The following two permissions are not required to use
Google Maps Android API v2, but are recommended.
-->
<uses-permission android:name="android.permission.ACCESS_COARSE_LOCATION" />
<uses-permission android:name="android.permission.ACCESS_FINE_LOCATION" />

<application
android:allowBackup="true"
android:icon="@drawable/ic_launcher"
android:label="@string/app_name"
android:theme="@style/AppTheme" >
<meta-data
android:name="com.google.android.gms.version"
android:value="@integer/google_play_services_version" />
<meta-data
android:name="com.google.android.maps.v2.API_KEY"
android:value="AIzaSyD8wfjeLpfhgLRs9I9zweaSJDNRpQsEGrQ" />

<activity
android:name=".ActivityWithMap"
android:label="@string/app_name"
android:theme="@android:style/Theme.Black.NoTitleBar" >
<intent-filter>
<action android:name="android.intent.action.MAIN" />

<category android:name="android.intent.category.LAUNCHER" />
</intent-filter>
</activity>
</application>
ActivityWithMap.java – nothing special here. Creating test data and adding fragment with address details – that’s all. Address class is a simple model to store data like street, town and coordinates (LatLng object)
package eu.michalu.nestedmapfragment;

import com.google.android.gms.maps.model.LatLng;

import android.os.Bundle;
import android.support.v4.app.FragmentActivity;
import android.support.v4.app.FragmentManager;
import android.support.v4.app.FragmentTransaction;
import eu.michalu.nestedmapfragment.model.Address;

public class ActivityWithMap extends FragmentActivity {

Address address = null;

@Override
protected void onCreate(Bundle savedInstanceState) {
// TODO Auto-generated method stub
super.onCreate(savedInstanceState);
setContentView(R.layout.activity);

address = new Address("Marszałkowska Street", "Warsaw", new LatLng(52.228083, 21.012967));

FragmentManager fm = getSupportFragmentManager();
AddressDetailsFragment addressFragment = (AddressDetailsFragment) fm.findFragmentByTag("address_fragment");

if (addressFragment == null) {
FragmentTransaction ft = fm.beginTransaction();
ft.replace(R.id.fragment_container_for_map, AddressDetailsFragment.newInstance(address), "address_fragment");
ft.commit();
fm.executePendingTransactions();
}

}
}
Hint: Highlighted line tells you that here we use activity’s fragment manager.
AddressDetailsFragment.java – In the fragment we will check if Android have access to Google Play services (and if everything seems to be ok) and load fragment with the map in proper container declared in XML file with layout. Please note that here we used ChildFragmentManager!
package eu.michalu.nestedmapfragment;

import android.os.Bundle;
import android.support.v4.app.Fragment;
import android.support.v4.app.FragmentManager;
import android.support.v4.app.FragmentTransaction;
import android.view.LayoutInflater;
import android.view.View;
import android.view.ViewGroup;
import android.widget.TextView;

import com.google.android.gms.common.ConnectionResult;
import com.google.android.gms.common.GooglePlayServicesUtil;

import eu.michalu.nestedmapfragment.model.Address;

public class AddressDetailsFragment extends Fragment {
private TextView mStreet;
private TextView mTown;

public static AddressDetailsFragment newInstance(Address venue) {
AddressDetailsFragment fragment = new AddressDetailsFragment();
fragment.setRetainInstance(true);
Bundle b = new Bundle();
b.putSerializable("address", venue);
fragment.setArguments(b);
return fragment;
}

@Override
public View onCreateView(LayoutInflater inflater, ViewGroup container, Bundle savedInstanceState) {
// TODO Auto-generated method stub
View v = inflater.inflate(R.layout.details_view, container, false);

Bundle args = getArguments();
Address address = null;
if (args.containsKey("address")) {
address = (Address) args.getSerializable("address");
}

int status = GooglePlayServicesUtil.isGooglePlayServicesAvailable(getActivity());
// Showing status
if (status == ConnectionResult.SUCCESS) {
{
FragmentManager fm = getChildFragmentManager();
MyMapFragment mMapFragment = MyMapFragment.newInstance(address.getCoordinates());
FragmentTransaction fragmentTransaction = fm.beginTransaction();
fragmentTransaction.add(R.id.my_map_fragment, mMapFragment);
fragmentTransaction.commit();
fm.executePendingTransactions();
}
}
mStreet = (TextView) v.findViewById(R.id.address_details_street);
mTown = (TextView) v.findViewById(R.id.address_details_town);
mStreet.setText(address.getStreet());
mTown.setText(address.getTown());

return v;
}
}
MyMapFragment.java – of course I don’t forget about our hero-fragment with map. This fragment extends SupportMapFragment (Google API) and in onCreateView initializes the map.
package eu.michalu.nestedmapfragment;

import android.os.Bundle;
import android.view.LayoutInflater;
import android.view.View;
import android.view.ViewGroup;

import com.google.android.gms.maps.CameraUpdateFactory;
import com.google.android.gms.maps.SupportMapFragment;
import com.google.android.gms.maps.model.LatLng;
import com.google.android.gms.maps.model.MarkerOptions;

public class MyMapFragment extends SupportMapFragment {
private LatLng mPosition;

public MyMapFragment() {
super();
}

public static MyMapFragment newInstance(LatLng position) {
MyMapFragment frag = new MyMapFragment();
frag.mPosition = position;
return frag;
}

@Override
public View onCreateView(LayoutInflater arg0, ViewGroup arg1, Bundle arg2) {
View v = super.onCreateView(arg0, arg1, arg2);
initMap();
return v;
}

private void initMap() {
getMap().moveCamera(CameraUpdateFactory.newLatLngZoom(mPosition, 15));
getMap().addMarker(new MarkerOptions().position(mPosition));
getMap().getUiSettings().setAllGesturesEnabled(true);
getMap().getUiSettings().setCompassEnabled(true);
}
}
initMap() method moves camera to (passed by argument) position and set zoom to 15. In next lines the marker, gestures and compas are enabled.
Main project is available on my github profile but please remember to add one dependency from your local filesystem: google-play-services-lib project
Working APK file is available here.
Leave your comment below, share this article and thanks for reading!
